
This Angles And Parallel Lines Worksheet is designed to help students of all ages to understand the basics of angles and parallel lines. It encourages students to explore the different types of angles, such as right angles, acute angles, and obtuse angles, as well as how to draw parallel lines and recognize when two lines are parallel. The worksheet also contains practice problems to help solidify the concepts, making it a great resource for any math classroom.
How to Use an Angles and Parallel Lines Worksheet to Teach Geometry
Geometry is an important subject for students to learn, and an angles and parallel lines worksheet can be a powerful tool for teaching this subject. By using this worksheet, students will be able to understand the concept of angles and parallel lines, and how they are related. Here is a step-by-step guide on how to use an angles and parallel lines worksheet to teach geometry.
Step 1: Explain the Concepts. Before beginning the worksheet, it is important to ensure that students understand the concepts of angles and parallel lines. Explain to the students that an angle is formed when two straight lines meet at a point, and that parallel lines are lines that never intersect.
Contents
- 0.1 How to Use an Angles and Parallel Lines Worksheet to Teach Geometry
- 0.2 Creative Strategies for Exploring Angles and Parallel Lines with a Worksheet
- 0.3 Benefits of Using an Angles and Parallel Lines Worksheet in the Classroom
- 0.4 Tips for Designing an Angles and Parallel Lines Worksheet
- 0.5 Best Practices for Assessing Student Progress with an Angles and Parallel Lines Worksheet
- 0.6 Images of Angles And Parallel Lines Worksheet Answer Key
- 0.7 Download Angles And Parallel Lines Worksheet Answer Key
- 1 Conclusion
- 1.1 Some pictures about 'Angles And Parallel Lines Worksheet Answer Key'
- 1.1.1 angles and parallel lines worksheet answer key
- 1.1.2 3-2 angles and parallel lines worksheet answer key
- 1.1.3 angles formed by parallel lines worksheet answer key
- 1.1.4 angles parallel lines and transversals worksheet answer key
- 1.1.5 angles formed by parallel lines puzzle worksheet answer key
- 1.1.6 angles formed by parallel lines and transversals worksheet answer key
- 1.1.7 worksheet section 3-2 angles and parallel lines answer key
- 1.2 Related posts of "Angles And Parallel Lines Worksheet Answer Key"
- 1.1 Some pictures about 'Angles And Parallel Lines Worksheet Answer Key'
Step 2: Demonstrate the Concepts. Once the students understand the concepts of angles and parallel lines, demonstrate the concepts by drawing them on the board. Draw several examples of angles and parallel lines, and explain how the angles are formed or how the lines stay parallel.
Step 3: Have Students Complete the Worksheet. Once the concepts have been explained and demonstrated, have the students complete the worksheet. The worksheet should contain several questions that require the students to identify angles and parallel lines, as well as questions that require them to draw angles and lines.
Step 4: Answer Questions and Provide Feedback. Once the students have completed the worksheet, review the answers and provide them with feedback. If any of the questions were answered incorrectly, explain why the answer was incorrect and how the student can improve.
By following these steps, students will be able to gain a better understanding of the concepts of angles and parallel lines, and how they relate to geometry. An angles and parallel lines worksheet is an effective way to teach these concepts, and help students gain a better understanding of geometry.
Creative Strategies for Exploring Angles and Parallel Lines with a Worksheet
1. Angles Worksheet: Students can explore angles by drawing different types of angles (acute, obtuse, right, and straight) on a worksheet. The teacher can provide a diagram with the different angle types, and have the students draw a specific type of angle in the designated spaces on the worksheet.
2. Parallel Lines Worksheet: Students can explore parallel lines by drawing a series of parallel lines on a worksheet. The teacher can provide a diagram with the lines and have the students draw the lines in the designated spaces on the worksheet.
3. Angle Measurement Activity: Students can explore angles by measuring the angles in a given diagram. The teacher can provide a diagram with angles, and have the students measure the angles using a protractor.
4. Parallel Line Identification Activity: Students can explore parallel lines by identifying the parallel lines in a given diagram. The teacher can provide a diagram with parallel lines, and have the students identify the lines by drawing lines connecting the corresponding points.
5. Transformation Exploration Activity: Students can explore angles and parallel lines by transforming a given diagram. The teacher can provide a diagram with angles and parallel lines, and have the students transform the diagram by rotating, reflecting, or translating it.
6. Angle Word Problems: Students can explore angles by solving a series of word problems. The teacher can provide a worksheet with word problems involving angles, and have the students identify the angle types, measure the angles, or calculate the angles.
7. Parallel Line Word Problems: Students can explore parallel lines by solving a series of word problems. The teacher can provide a worksheet with word problems involving parallel lines, and have the students identify the lines, measure the lines, or calculate the lengths of the lines.
Benefits of Using an Angles and Parallel Lines Worksheet in the Classroom
Using an angles and parallel lines worksheet in the classroom provides a number of benefits for students. Firstly, it encourages students to practice and reinforce their understanding of the concepts related to angles and parallel lines. The worksheet can be used to help students better comprehend the various properties and features of angles and parallel lines such as angles of a triangle, angles in a quadrilateral, angles formed by parallel lines, and angles formed by transversals. This helps students become more comfortable in solving problems related to angles and parallel lines.
In addition, the worksheet provides an opportunity for students to practice their problem-solving skills. The questions posed on the worksheet require students to think logically and use their knowledge of angles and parallel lines to come up with solutions. This allows students to develop their critical thinking skills and become more adept at problem-solving.
The worksheet also helps to improve students’ retention of angles and parallel lines concepts. By providing an organized and systematic approach to learning, the worksheet facilitates the memorization of angles and parallel lines concepts. Students can use the worksheet to review and practice the concepts, which can help them to retain and apply their knowledge of angles and parallel lines in real-life situations.
Finally, using an angles and parallel lines worksheet in the classroom can be a great way to supplement traditional classroom instruction. By providing students with additional practice opportunities, the worksheet can help to reinforce the concepts taught in the classroom. This can help ensure that students have a better understanding of the material, allowing them to become more proficient with angles and parallel lines.
Tips for Designing an Angles and Parallel Lines Worksheet
1. Choose a variety of topics to include. Include definitions for angles, parallel lines, types of angles, and related terms.
2. Create clear, concise instructions for each exercise. Give students enough guidance to complete the task without giving away the answers.
3. Provide examples of each concept to help students understand the material.
4. Include diagrams and illustrations to help students visualize the concepts.
5. Incorporate some questions that require students to explain their answers.
6. Include questions that require students to create their own diagrams or illustrations.
7. Make sure the questions are well-written and free of errors.
8. Provide spaces for students to record their answers and any notes they took while completing the worksheet.
9. Once the worksheet is complete, have students review their answers and explain their reasoning.
10. Grade the worksheet and provide feedback to students.
Best Practices for Assessing Student Progress with an Angles and Parallel Lines Worksheet
Assessing student progress with an angles and parallel lines worksheet is an important part of evaluating their understanding of the concepts. To ensure the most accurate assessment of student learning, educators should incorporate best practices into their assessment strategies.
1. Provide Clear Instructions: Before beginning the worksheet, it is important to provide students with clear, concise instructions that outline the expectations for the activity. This will help them focus on the task at hand and feel more confident about their ability to complete the worksheet.
2. Utilize a Variety of Questions: When creating an angles and parallel lines worksheet, it is important to include a variety of questions that address different aspects of the topic. This will allow students to demonstrate their understanding in a more comprehensive way.
3. Allow for Open-Ended Questions: Allowing for open-ended questions can give students the opportunity to express their creative thinking and problem-solving skills. This will provide a more holistic assessment of student learning.
4. Give Time for Reflection: After completing the worksheet, it is important to provide students with an opportunity to reflect on their understanding and areas of improvement. This will give them a better sense of their progress and provide insight into the areas they need to focus on.
By following these best practices, educators can ensure that they are providing an accurate assessment of student progress when using an angles and parallel lines worksheet. Doing so will allow them to identify areas of improvement and provide targeted instruction to help their students reach their full potential.
Images of Angles And Parallel Lines Worksheet Answer Key
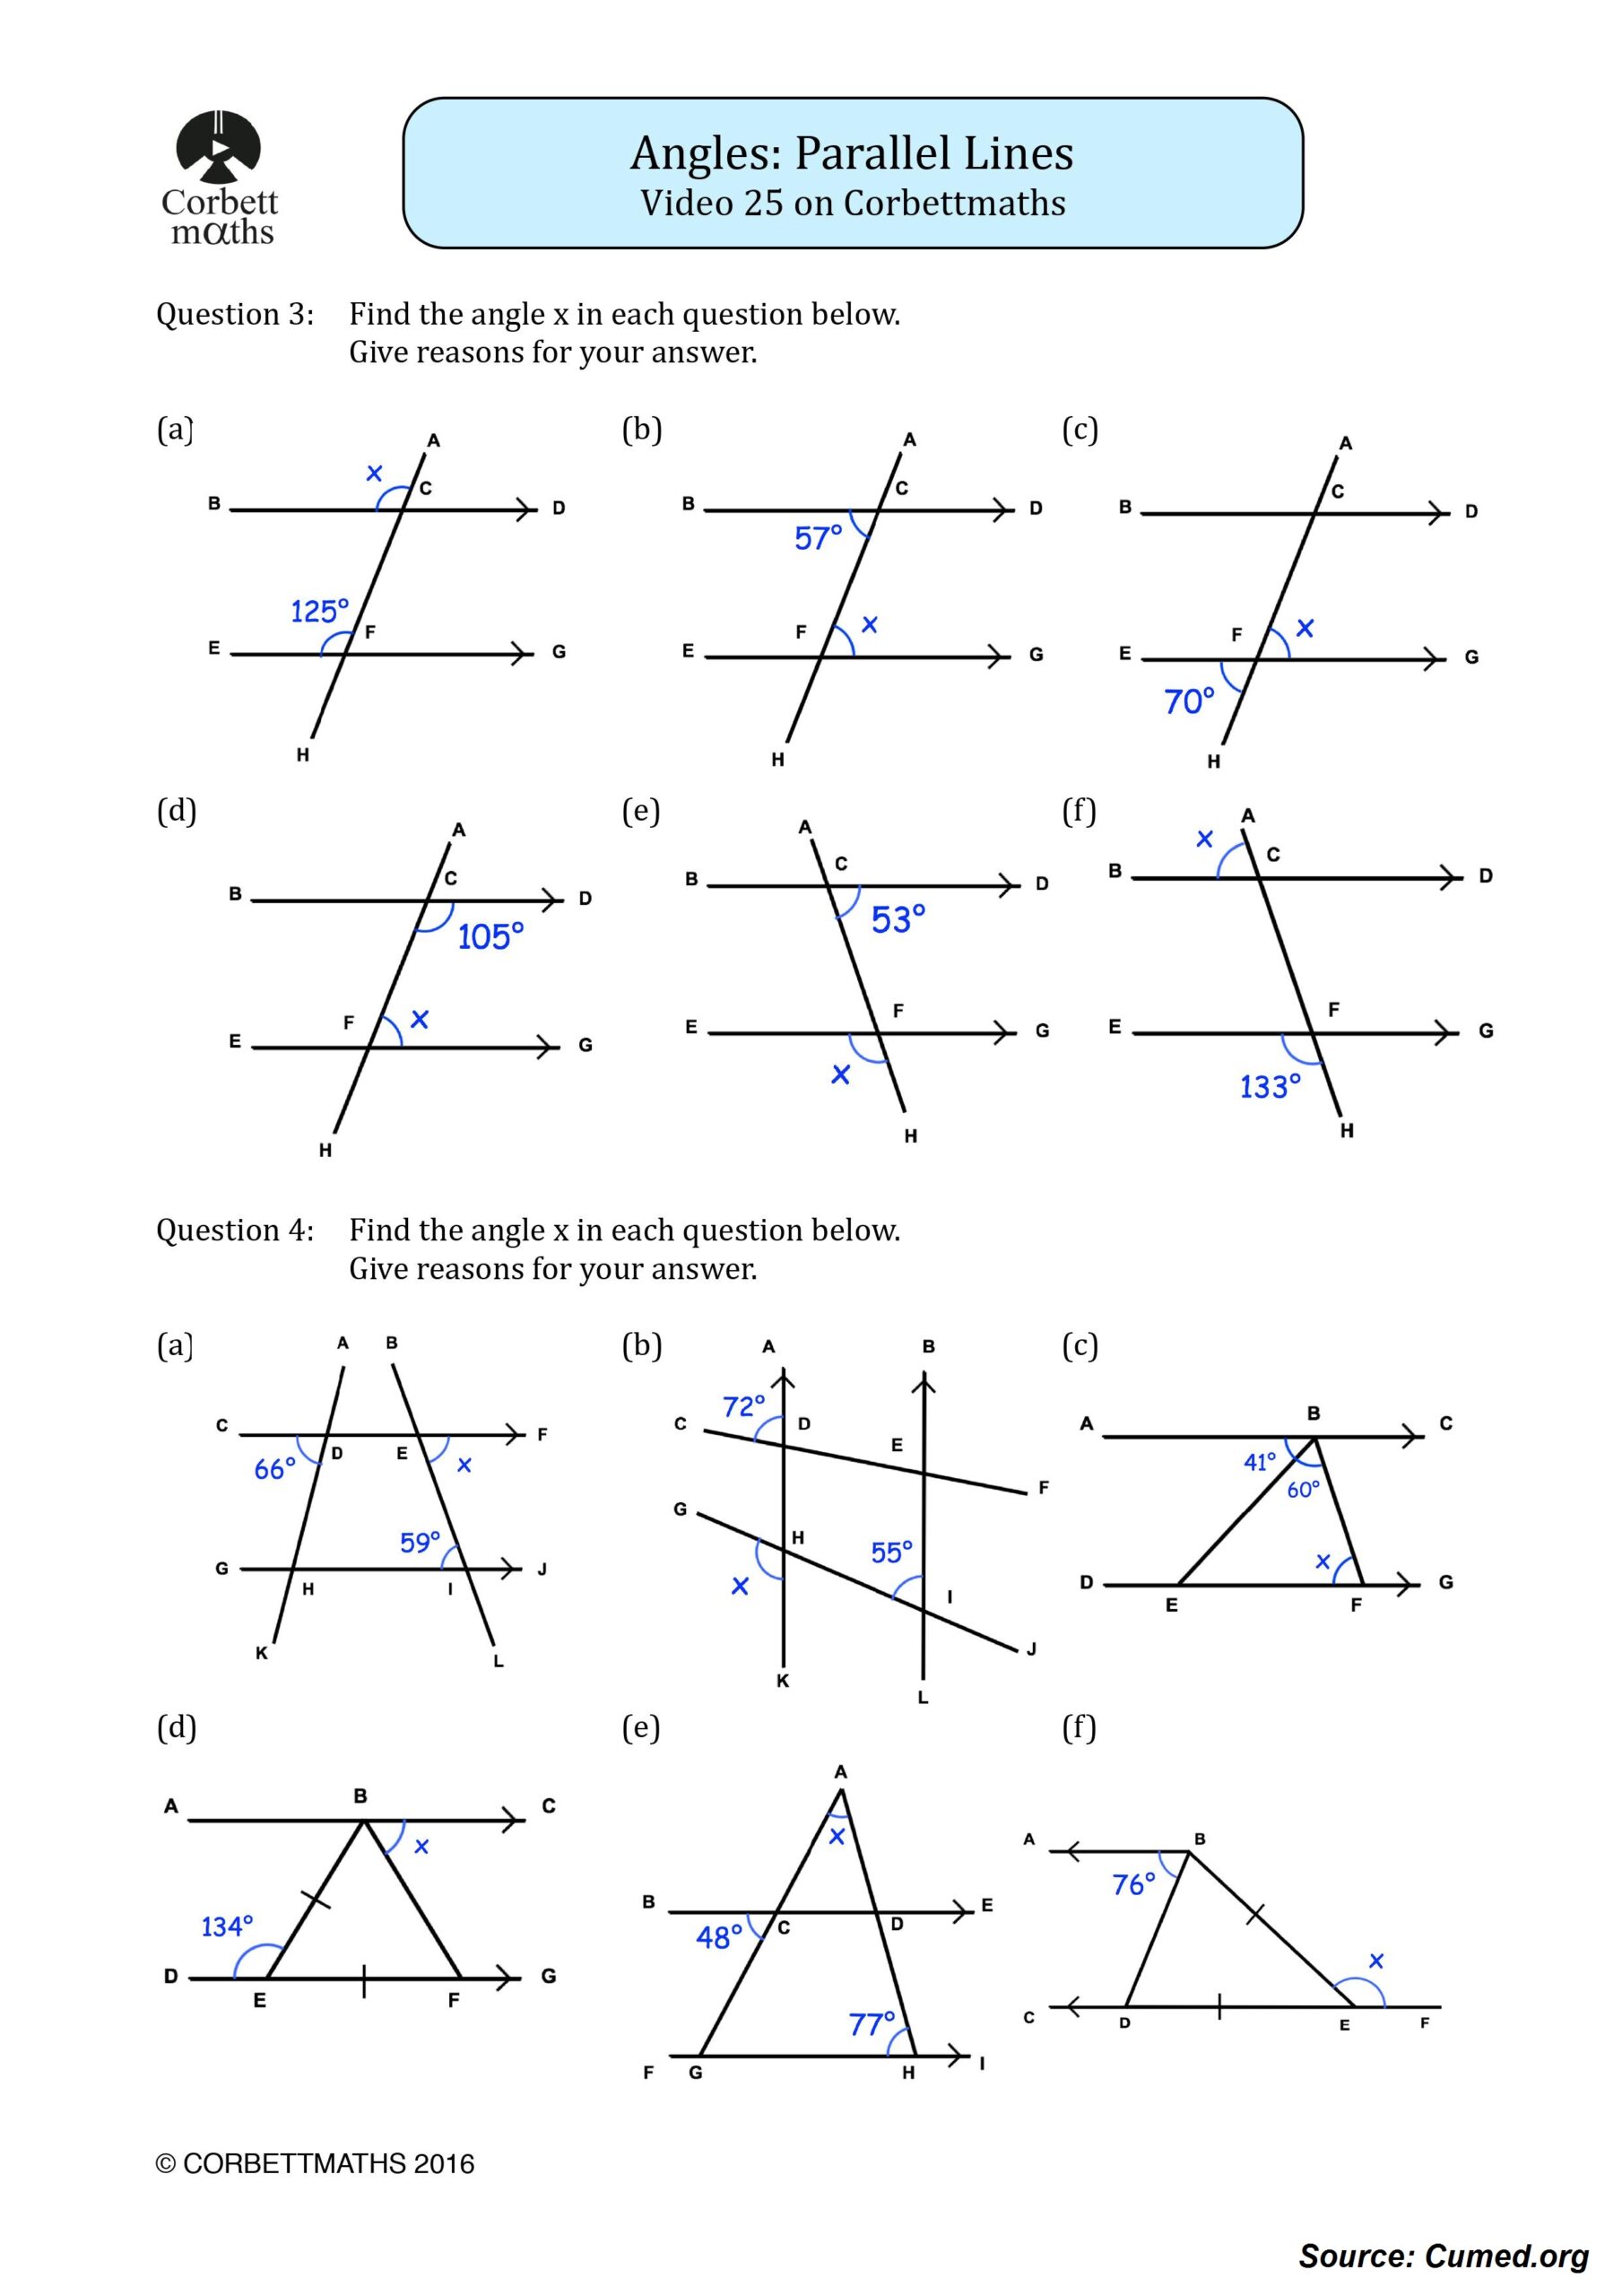
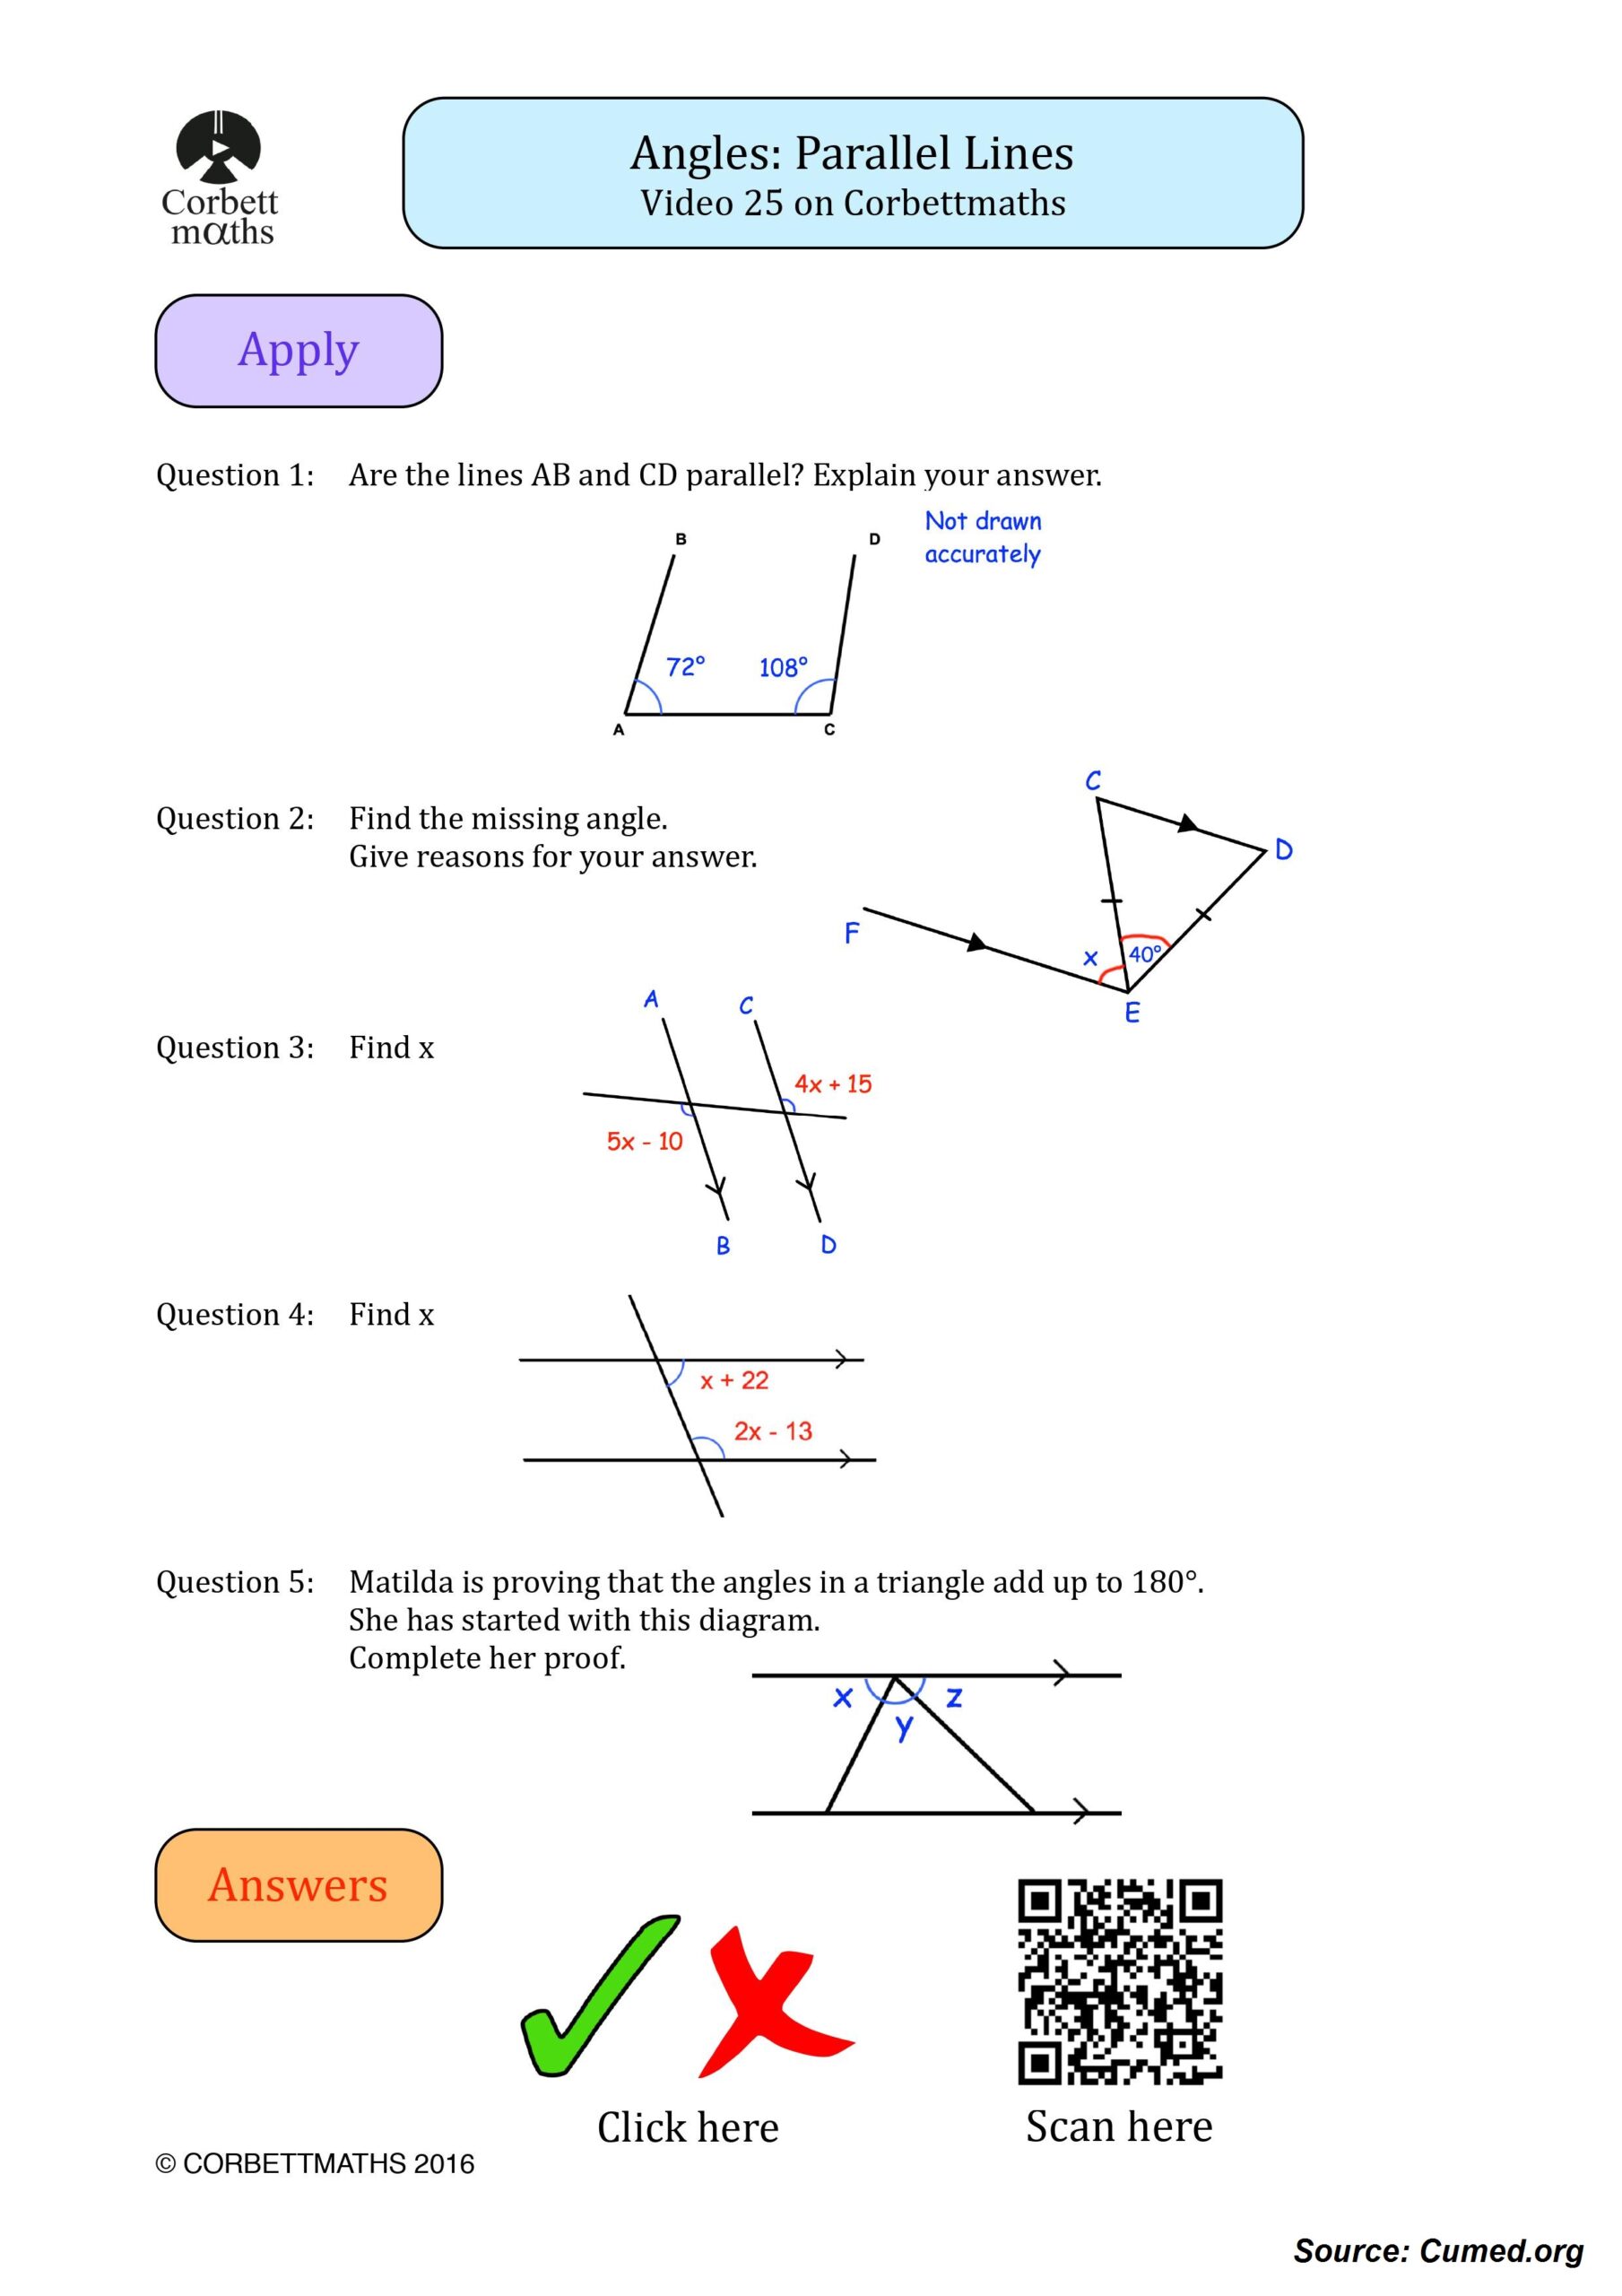
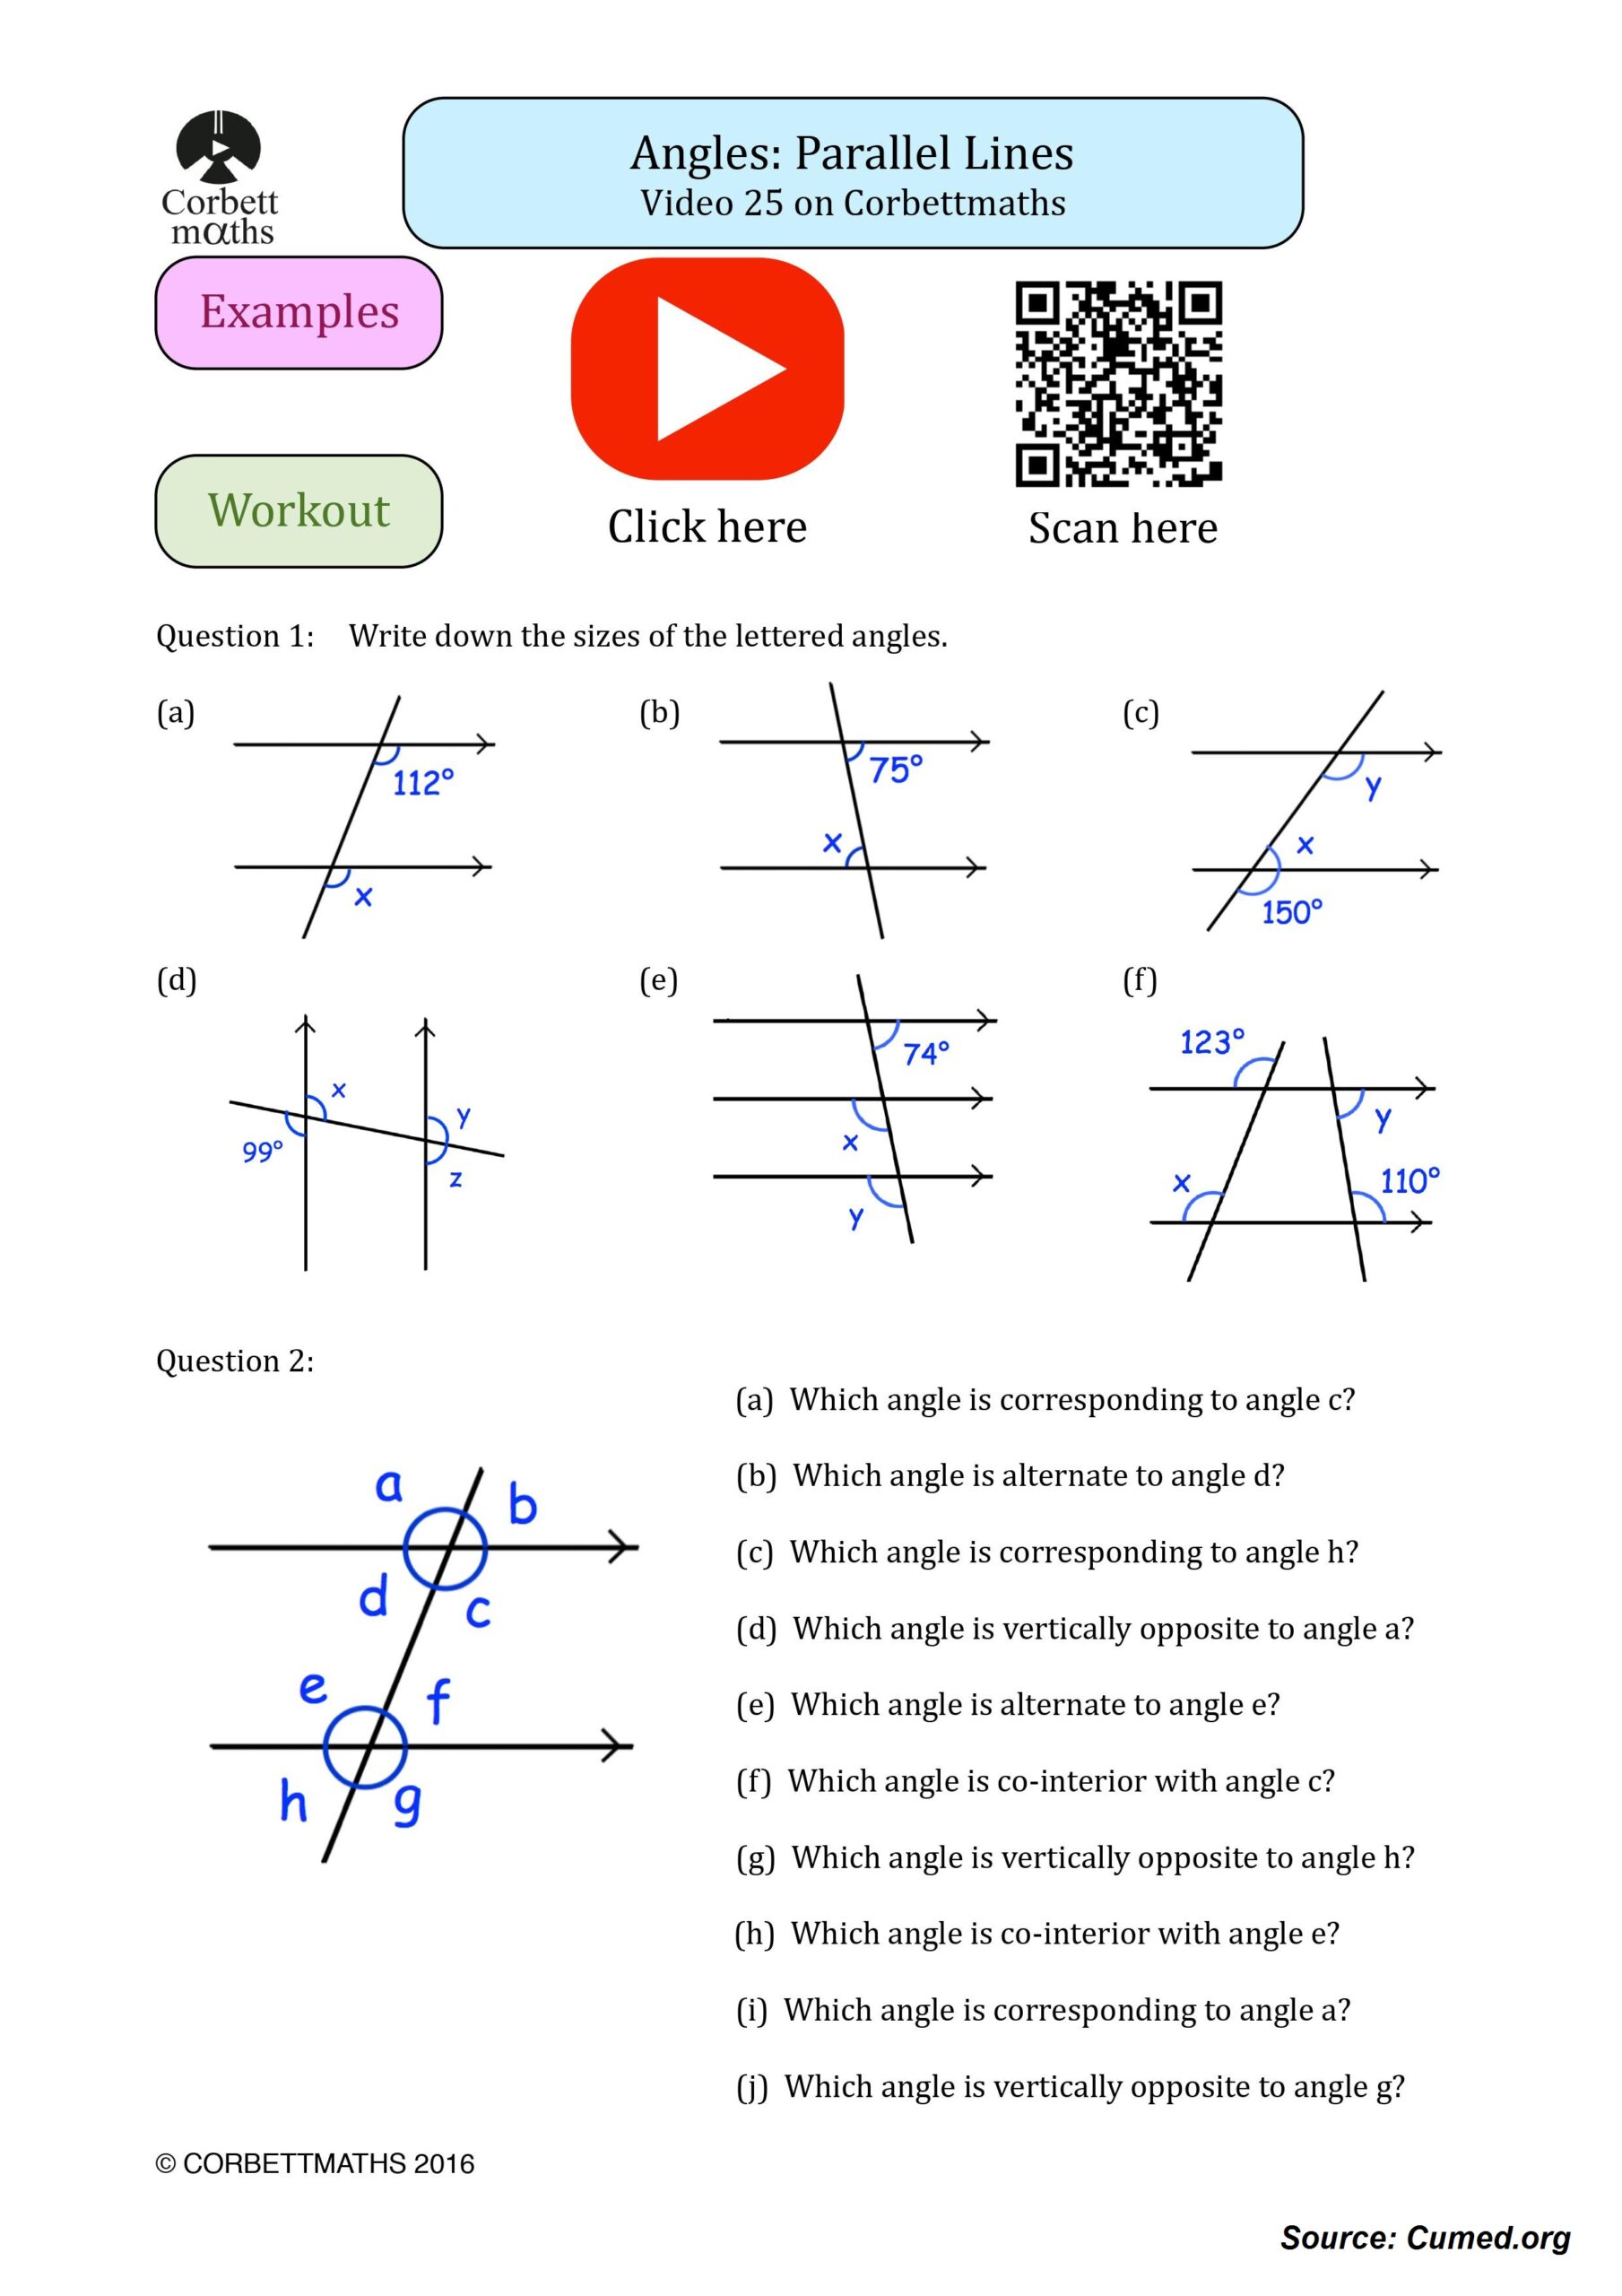
Download Angles And Parallel Lines Worksheet Answer Key
Download Angles And Parallel Lines Worksheet Answer Key: click here
Conclusion
The Angles And Parallel Lines Worksheet has provided a great introduction to the concept of angles and parallel lines. It has shown how to calculate the size of angles and measure the length of parallel lines. With this worksheet, students can gain a better understanding of these concepts, and with more practice, they can be better prepared for their next math lesson.
Some pictures about 'Angles And Parallel Lines Worksheet Answer Key'
Related posts of "Angles And Parallel Lines Worksheet Answer Key"
Ser And Estar Worksheet Answer Key
This Ser and Estar Worksheet is a great resource for Spanish learners who want to learn the differences between the two verbs ser and estar. This worksheet provides explanations, examples and practice activities for the two verbs. It can be used as a reference for those who are already learning Spanish, or as an introduction...